One of the most common things beginner painters run into is cutting in paint on ceilings, around skirting boards and other areas that require a neat straight line of paint.
Today we are going to be going through some of our top tips to help you cut in paint perfectly every time. Whether you are a DIY-er or just getting started on your professional decorator journey, we will have many tips and advice on how to help you increase your speed and accuracy.
- Decant paint into a pail
- Don’t wipe the brush
- Wiggle the brush into corners
- Use a high quality angled brush
- Ensure good lighting
- Slowly work up to the line
- Use a paint conditioner
- Groove textured ceilings
- Feather the edge
- Cut in one wall at a time
- Use high quality tape
- Have a damp rag on stand by
Decant paint into a pail
We recommend that you decant about 1 inch of paint into a small paint pail. This is because having a small amount of paint available will stop you from being able to dip your paint brush in too far, making it heavy and prone to drips and spills.
Don’t wipe the brush
It’s very common practice to dip your brush and the wipe the excess off on the side of the tin. However, it is more efficient if you instead pat the brush against the sides of the pail. This will help remove large amounts of paint but still keep a good amount loaded on the brush to make cutting in quicker.
Wiggle the brush into corners
Wiggling the brush ever so slightly into tight corners and filling in missed areas is very helpful. Be careful not to wiggle the brush too hard though, we’re only really talking about a slight movement to the left and right to achieve excellent results.
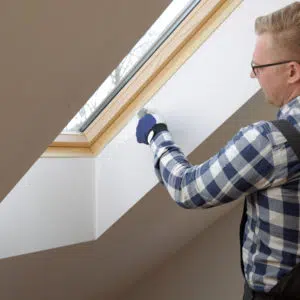
Use a high quality angled brush

Unless you are a pro and have many years of experience, we recommend using a high quality angled brush to help you get professional looking results first time. The angle makes it especially easier to get into corners and you can fan out the tip to get a fine line.
You will find a 2 or 2-1/2 inch wide brush perfectly suitable for most interior purposes. We recommend using a smaller brush for cutting in around windows or small wood work as it’s easier to paint more accurately with a smaller brush.
Ensure good lighting
Make sure you have good lighting when it comes to cutting in. This is especially true when working with light colours as it might be difficult to differentiate between the colours in lower lights. We recommend painting during bright days, but as this is not always a possibility (especially in the UK!) the next best thing is a head torch.
You can pick up a head torch for very little and it can make quite the difference having the source of light at eye level.
Slowly work up to the line
Although the pros might be able to go straight in and up to the line first try, we recommend you slowly work up to the line in 2 or even 3 passes.
Don’t worry about getting too close on the first pass, just start by sweeping the brush up to the line to deposit some paint on the wall. Without going back for more paint, simply make a second pass to slowly move the paint closer to the line. You can fan out this bristles and use the very tip of the brush to create a really nice neat straight line.
If necessary, you can do this a third time to get a really nice close cut.
Use a paint conditioner

One of our top tips that will really help you to cut paint in perfectly is using a paint conditioner. Paint conditioners help improve paint flow and workability of paint as well as eliminate brush and roller marks. The improved paint flow also allows you to make progress quicker.
We have two available from Owatrol UK, Floetrol and Owatrol Oil:
Floetrol is for use in water-based paints.
Owatrol Oil is for use in oil-based paints.
Groove textured ceilings
You will find that it is almost impossible to get a really nice clean cut in when painting up against rough textured ceilings. Due to the texture of the surface, taping it will not work either.
The best course of action is to remove some of the texture. To do this, take a clean putty knife and hold it at a 45 degree angle to the wall and simply run the blade along the edge of the ceiling. Doing this will scrape away a very small amount of the texture and create a small groove.
Use a clean and dry paint brush, can of compressed air or duster to remove the dust. Once the groove is nice and clean, when you come to cutting in, the bristles of the brush will slip into the groove and create a nice clean straight line.
Feather the edge
Once you have created your cut in finish the edge by brushing it out, or ‘feathering’ it. Don’t pick up any more paint but instead simply brush the bristles over the outside edge to remove any ridges or build up that may have occurred.
This is a handy step in the process to make sure you don’t see a stripe of paint after you roll out the walls.
Cut in one wall at a time
Although you might want to just crack on with all the cutting in at once, you will get better results if you do one wall at a time. This is because if you roll out the wall straight after cutting in, whilst the paint is still wet, the cut-in paint and the wall paint will blend much better. This will significantly reduce the chance of lap marks.
Use a high quality tape

The pros may find using tape a thing of the past, but if you’re just starting out or are a casual DIY-er, using tape might help you cut in paint perfectly. If that’s the case, we recommend purchasing a specific painters tape and using a high quality one at that.
This is because masking tape (or low quality painters tape) can leave a sticky residue behind when it come to removing. You certainly don’t want to be scrubbing your freshly painted walls with soapy water to remove it!
Another common problem is the paper part of the tape might be very thin and constantly rip come when being removed.
Have a damp rag on stand by
Even the very best will some times get paint on areas they don’t want it. A common solution to quick and easy removal of excess paint is with a damp rag and a putty knife.
Simply wrap the rag around the knife once and slide the putty knife along the surface (such as a door frame). Make sure you do this right away whilst the paint is still wet.
So there you have it, our top tips on how to cut in paint perfectly!
If you have any other advice or top tips, please feel free to leave them in the comments below. We love hearing from you!
You can also follow us on Twitter, Facebook, Instagram or Pinterest at @OwatrolUK or find us under the hashtag #OwatrolUK

About Owatrol Team
Our team are ready and willing to support you with your requirements whether it is protecting your newly laid deck or renovating a luxury yacht, whatever the application Owatrol has the solution you are looking for.