Painting walls in your home is not necessarily a difficult task, but if not done well it can look dreadful. By taking a few simple steps you can ensure a great finish without necessarily needing to employ a professional. Our handy ‘how to’ guide walks you through the process step by step so that even a novice can achieve a good finish.
Choosing paint type and colour

Before you begin your painting you need to have a bit of a think (with a coffee and a biscuit perhaps?) about the look you are after and how you’re going to achieve it. There are many different types of paint and many different effects you can achieve using them. Think carefully about what you want out of your room and about how you want it to make you feel. Do you want something calm and relaxing or something more vibrant?
Here are a few things to think about:
- How big is the room? Small rooms often feel even smaller when painted in darker colours.
- How much natural light does the room have? If the windows are small or there is a reduced amount of natural light for whatever reason, consider using a colour which will reflect the natural light.
- Do you want a feature wall in a different colour? These can be a real statement but do remember that things can go out of fashion quickly. That lime green wall might seem like a great idea now but in a year or two you might find yourself hating it. That’s not to say don’t make a big statement – just think carefully about what you want first!
- Are you going to be using wallpaper or do you have any soft furnishings to match to? Consider taking a sample of these with you to the paint shop or bring some colour samples home to help match.
Once you’ve decided on your look and feel, get shopping! However, don’t just leap in and buy straight away. At the very least bring some colour charts home to look at in the room you’re doing to be painting. Or even better, buy a few sample pots and try them out.
Once you’ve finalised your ideas then get buying. Be sure to buy enough for the whole project at the beginning so measure carefully to work out your coverage.
What tools will I need to paint my walls?
OK so you can paint a room with minimal equipment or you can use a load of fancy gadgets – it’s entirely up to you – but at a minimum you need:
- Paint
- Paintbrush (a good quality paintbrush is essential for achieving a good finish – don’t scrimp here!). A smaller brush for edging is also useful
- Roller (again don’t go for thee cheapest)
- Paint roller tray
- Painter’s tape (masking tape is fine but we’d advise low-tack tape – you don’t want it pulling the paint off!)
- Plastic dust sheets/old sheeting
- Bucket/tub for paint mixing
- Paint conditioner (see below)
Before you start

Unfortunately even well-known brands of paint can vary in colour from batch to batch so it is always worthwhile mixing all your paint together in a larger container at the beginning and working from there rather than working from individual tins. You then use a paint kettle to carry just a small amount at once – you don’t need a special container anything will do. The professionals will usually use a professionals will tend to use a metal or plastic container lined with a layer of foil to prevent lengthy cleaning!
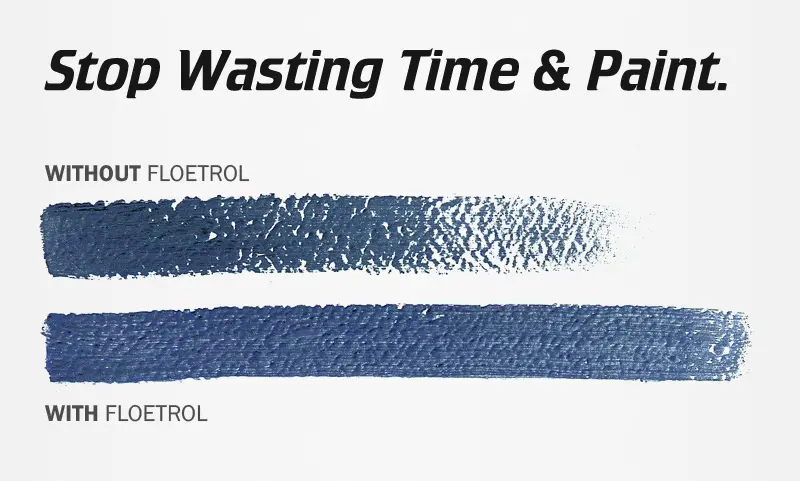
We would also recommend adding a paint conditioner to improve the flow of your paint. This may sound a little like jargon but essentially a paint conditioner helps to maintain the ‘wet edge’ of your paint which lets you work with it for a little longer before drying and allows for a more professional finish by reducing brush and roller marks. We would recommend Floetrol paint conditioner which is suitable for use in all water-based paints (for oil-based paints use Owatrol Oil) and does not effect the inherent qualities of the paint. This might seem like an unnecessary additional expense but for the improvement it will make to your finish it is really worth a small investment.
At this point it’s time to put down your dust sheets and tape up your edges (if you’re not confident with beading edges).
Painting the edges
It’s up to you whether you paint the edges first or afterwards but you can achieve a better finish if you do them first. It’s 2 basic steps:
- Make 4 or 5 overlapping strokes with your paint brush perpendicular with the edge you are painting
- Make one long stroke along the edge either alongside your tape or by beading (see below)
Continue these two steps all the way along your edge.
How to bead edges when painting
The main skill needed for beading is a steady hand. It’s a simple process but without a steady hand you’re not going to get a neat finish. If you’re worried about this then we’d recommend using tape for your edges instead. Alternatively you can use a piece of stiff card to guard the edge as you go.
If you’re going to give beading a go then follow these simple instructions:
- Run your brush parallel to the edge a short distance away from it (edge-on so with the larger flat side of the paintbrush against the wall so the bristles can spread out slightly)
- Slowly move the paintbrush along the edge with the splayed bristles creating a ‘bead’
- Continue to work closer to the edge until you get your ‘bead’ exactly where you want it
Painting your wall

Once you’ve completed your edges you can use a roller to finish off the rest of the wall. Using a paint conditioner means that your rolled paint should look more like it’s been sprayed by a pro! First pour some paint into your tray (the paint well should be about 1/3 full).
Next dip your roller into the paint and roll it back and forth on the bumpy part of the tray to cover it evenly.
When rolling the paint onto the wall use overlapping strokes in different directions and try not to go too fast. You’ll soon splatter paint everywhere if you do! Don’t overload your roller and work in a smallish area at a time.
Once your roller needs reloading move to a new area next to the part you’ve just painted and work your way back to the painted area. That way the wet edges will be blended nicely.
Alternatively you can use a paintbrush to paint your wall (we’d recommend one between 10-12cm). To do this first dip your paintbrush into your paint (about 1/3 of the bristles) and then start painting at the top of your wall in short, overlapping horizontal and vertical strokes.
Work in smallish panels and merge one area into the next whilst it is still wet. It’s best to work a complete wall in one go, but if you can’t finish your whole room in one day don’t worry! Just wrap your paintbrushes tightly with cling film and they should stay soft until the morning.
Read the manufacturer’s instructions carefully to see how many coats you will need to apply and how long you need to leave the paint to dry in between coats.
Clean Up
Remember to clean all your tools as soon as you’re finished as it’s difficult to clean paint from a brush once it’s dried on!
We hope you found this post on how to paint a wall interesting. If you have any other advice or top tips, please feel free to leave them in the comments below. We love hearing from you!
You can also follow us on Twitter, Facebook, Instagram or Pinterest at @OwatrolUK or find us under the hashtag #OwatrolUK
About Owatrol Team
Our team are ready and willing to support you with your requirements whether it is protecting your newly laid deck or renovating a luxury yacht, whatever the application Owatrol has the solution you are looking for.