
In this part of our fencing guide we’ll be explaining how to erect a closeboard (featheredge) fence. This can be more taxing than a standard lap panel fence and as such some people may choose to have it installed by a professional. However, this can be extremely expensive and with the right guidance you should have no problems erecting it yourself (although it’s easier as a 2-man job – but isn’t everything!).
In this guide we’re assuming that you’ve already installed your posts (check out our earlier post on erecting fence posts for advice on doing this). The important thing to remember is that with a closeboard fence you need to ensure that the notches in your posts are all facing the correct way (usually to the rear of the fence) so that your horizontal arris rails can slot in comfortably. The last thing you want after setting in a post is to have to dig it out to turn it around!

The next step after setting in your posts is to attach the arris rails (the horizontal support beams which you will later attach the featheredge boards to. These are usually 3.6m in length and you should cut the first one to 1.8m in order to stagger the joins and provide a more sturdy finish. The arris rails should be secured to the posts using galvanised nails (75mm).
Once all the arris rails are in place you can fit the gravelboard at the base of your fence. This needs to be level across the length of your fence if possible to create a level top to the fence – even if this means digging the gravelboard into the ground at one end of the fence. Of course, if you are fitting your fence on a slope then this will not be the case. You can use galvanised nails or stainless steel screws to attach them to the fence posts.
Next you need to sit your featheredge boards on top of the gravelboards and attach them to the arris rails. This will need to be done one at a time and you should use one nail per arris rail for each board – this allows the wood to expand and contract naturally and will avoid splitting which could occur. Ensure that you overlap the boards by 25mm to allow for expansion and contraction and do not nail 2 boards together. The best fixings to use for this job are 50mm galvanised nails.
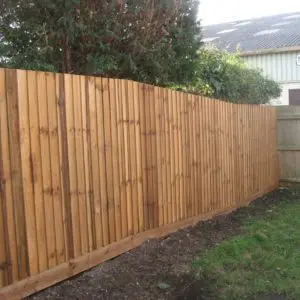
Image courtesy of Rachel Coleman
Once all your featheredge boards are securely attached you have 2 options. You can either leave the fence as it is, or you can purchase lengths of capping timber which sit on top of the featheredge boards to provide a smooth finish. It’s entirely up to your aesthetic tastes!
Now your closeboard fence is complete you should be sure to protect it with a good quality wood protection product. In the next few posts in this series we will be discussing the main options in wood treatment and protection as well as how to maintain your fence for years to come.
Please note that Owatrol UK can take no responsibility for the advice offered on this page. Before you begin any DIY project you should be aware of any possible health and safety issues – if in doubt seek professional assistance. If you are unsure then please get in touch with you and we can provide assistance where possible.
We hope this post on erecting a closeboard fence interesting. If you have any other advice or top tips, please feel free to leave them in the comments below. We love hearing from you!
You can also follow us on Twitter, Facebook, Instagram or Pinterest at @OwatrolUK or find us under the hashtag #OwatrolUK
About Owatrol Team
Our team are ready and willing to support you with your requirements whether it is protecting your newly laid deck or renovating a luxury yacht, whatever the application Owatrol has the solution you are looking for.

